Curved stone work: radius, templates and the cost of a curve
A curve is not a more expensive straight line. It removes the repetition that makes stone affordable, which is why it starts with a template taken on site and ends with a joint plan.
22 October 2026 · 13 min read · GranTerra Stone, Hui'an
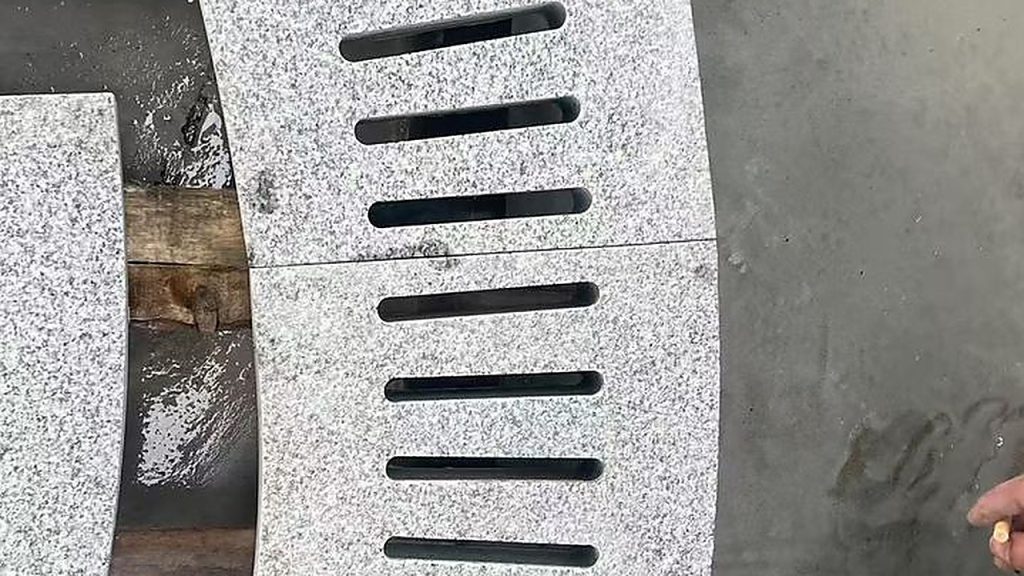
A client sends a plan with a curved terrace, a round counter and a wall that turns through a sweep instead of a corner, and then asks for the same price as the straight version. The material is the same granite, the finish is the same hone, the area is nearly identical. The number that comes back is not, and the reason is not that curves are difficult in the way that a hard jigsaw is difficult. It is that a curve quietly removes the one thing that makes stone affordable: repetition.
A straight line is a default, a curve is a decision
Almost everything about how stone is priced assumes that pieces repeat. A straight run of paving can be laid out in a module, and once the module is fixed, the works cuts the same piece hundreds of times. Setting up for the first one is expensive and the second one is nearly free. A straight coping run works the same way, and so does a straight cladding field.
A curve breaks that assumption at the first step. Go along a curved edge and every piece has a slightly different length, a slightly different angle at each end, and often a different width because the radius is measured from a point that the piece does not sit square to. There is no module to repeat. Each piece becomes a separate drawing, a separate set-up, a separate cut and a separate number in the packing list.
That is the honest answer to the price question, and it is worth saying plainly at the start of a project rather than at the end. A curve is not a more expensive way of making a straight thing. It is a different kind of purchase, closer to a set of individual pieces that happen to relate to each other than to a batch of one product.
Losing the batch is the real cost
Buyers often assume the premium comes from cutting time, and expect it to be modest. Cutting a curve does take longer, but that is not where the money goes. The money goes into everything that used to be shared and now cannot be.
The block still has to be bought as a block, and a curved scheme usually produces more offcut per square metre because pieces are nested into a slab at angles rather than packed in a grid. The saw still has to be set up, but now it is set up for one piece instead of a hundred. Edges still have to be profiled, but the profile follows a curve, which means either a machine path prepared for that specific piece or a hand finish by someone who can hold a consistent section around a sweep. Nothing is checked by measuring one piece and assuming the rest match, because none of them do. Each piece is checked against its own position in the layout.
Add the dry-lay, where the pieces are assembled on the floor at the works in their intended order to confirm that the curve closes and the joints read evenly, and the pattern of the cost becomes clear. It is labour spread thin across unique pieces rather than concentrated on a set-up. That is why a curve can cost multiples of a straight run without any single step looking extravagant.
There is a practical consequence for the design, not just the budget. Where a scheme has a lot of curve, it usually pays to keep the curved portion to the places it is actually doing something — a threshold, an edge, a bar front — and keep the large fields straight. The saving is not in the curve being cheaper somewhere else. It is in reducing how many unique pieces the job needs.
A curve begins as a template, not as a dimension
The drawing gives the design curve. The building gives the real one, and they are rarely identical. A wall that was specified straight has a bow in it. A column that was specified round is not quite round, and its centre is not where the grid says. A curved retaining wall settles and moves before it is faced.
On a straight run, those small differences get absorbed. The joint opens a millimetre here and closes one there, and nobody sees it. On a curve there is nowhere to absorb anything, because the error runs along the arc and accumulates into a joint that is visibly wide at one end and tight at the other. That is why serious curved work starts with a template taken on site — a plywood or card profile of the actual condition, in the actual place, checked against the actual substrate.
Two kinds of template matter. A profile template records the shape of an edge or a column at a specific height. A setting-out template records the geometry of the whole run: where the curve starts, where it ends, where the tangent points are, and where the joints have been planned to fall. Both should be signed off before any material is cut, because a template is cheap and a curved piece cut to a wrong curve is not.
This is the single point where curved projects most often go wrong, and it goes wrong in a predictable way. The stone is ordered from the architect’s drawing, the site is not templated, the pieces arrive, and the curve does not close. At that stage every option is expensive: recut the pieces, build out the substrate, or widen the last joint and hope nobody looks at the end of the run.
Inside arcs and outside arcs are not the same problem
An outside arc — a convex edge, like the nose of a curved step or the outer face of a round counter — is cut by taking material away from a larger piece. The blank has to be big enough to contain the whole curve, so the offcut is substantial, and the larger the sweep the more material is bought and never used.
An inside arc — a concave edge, like the inner face of a curved wall or the inside of a radiused cut-out — is cut by reaching into the piece. That is where a hard limit appears, because the tool has to fit. A circular blade can only follow a curve tighter than its own diameter, and below that the cut has to be made another way: a smaller tool, a wire, a water jet, or a sequence of passes that approximates the curve and is then dressed back by hand. Each of those is slower, and some leave a different surface that has to be brought back to the finish of the rest.
The practical reading is that a tight inside radius is the expensive direction, and a tight outside radius is the wasteful one. When a design can choose, it is usually cheaper to let the curve open outward. When it cannot, the radius should be agreed early, in writing, because it is the number that decides which process the piece goes through and therefore what it costs.
What the machine can do, and what the stone will allow
A CNC saw or a water jet will follow any line that can be drawn. That is not the constraint. The constraint is what the stone does once it has been cut into the shape the line describes.
Granite is strong in compression and much weaker in bending, and its strength across the grain of the material is not the same as along it. A curved piece that ends in a narrow neck — a thin waist between two wider ends, a sliver at the end of a sweep, a long horn where a curve meets a straight — concentrates stress exactly where there is least material, and that is where a piece breaks in handling or, worse, after it is fixed. Veining and micro-fractures make it worse, because they are invisible on a sawn face until the piece is thin enough for them to matter.
Thickness is the practical answer, and it is worth protecting in the design rather than arguing about after the first breakage. A curved piece that looks elegant on a drawing at a thin section is often the piece that arrives in three parts. Where a curve has to be slender, it is usually better to change the detail — support the curve along its length, split it into segments with a supporting member behind, or bring the reveal back to something the material can hold — than to insist on the drawing and accept the failure rate.
There is also a finishing constraint that gets missed. A polished or honed surface has to follow the curve with a consistent sheen, and that is done by hand on shaped work. Where the curve is tight, the hand work is concentrated and the risk of a patchy surface goes up. A flamed or bush-hammered finish hides that much better, which is one reason curved exterior work so often reads better in a textured finish than in a mirror polish.
Joints are the grammar of a curve
A curve is always built from pieces, and the joints are what make it read as a curve or as a series of straight bits pretending. Two rules do most of the work.
The first is direction. Joints that run radially — each one pointing back toward the centre of the arc — keep the joint width constant, because every joint is measuring the same angular slice. Joints laid parallel to each other do not: the outer edge of the piece is longer than the inner edge, so the width changes along the run and the mismatch accumulates until one joint is visibly fat. Radial joints are more work to cut and set out, and they are the reason a well-built curve looks calm.
The second is placement. Curves should break at points the eye already accepts: where the curve meets a straight, where a pier or a post interrupts the run, at a change of direction, or at a natural centre line. A joint placed at an arbitrary point on a smooth sweep draws attention to itself, because the eye is following the arc and the joint interrupts it. Where the run is long, it is worth planning the joint positions on the drawing before the pieces are cut, and worth checking that the resulting pieces are all buildable rather than one of them being an awkward sliver.
Where a curve is mirrored — two halves of a round counter, a symmetrical sweep either side of an entrance — there is an argument for book-matching the pairs, so the two sides read as one stone rather than as two similar ones. That has to be decided at the slab stage, not at the saw, which is the same logic that governs any matched work.
Where a curve holds water
Curves change how water behaves, and the change is usually in the wrong direction. A curved paving field is a shallow bowl unless the falls are designed around the arc, and water collects at the lowest point of the geometry rather than at a drain. A curved step is a place where water sits against the riser, because the fall around a sweep is never as simple as a straight run. A curved coping or cill throws water differently from a straight one, because the drip line curves and the overhang has to follow it.
The details that work on a straight run need rethinking rather than repeating. A drip groove has to be cut along the curve, which is a different operation from running a groove along a straight edge, and it is often the detail that gets dropped because it is fiddly. A curved pool edge needs the same treatment as a straight one — overhang, drip, and a joint that sheds rather than holds — but on a radius, so both the overhang and the joint have to be maintained through the sweep rather than assumed.
The useful habit is to sketch the water path on the curved part of the plan before approving it. Where does rain land, where does it run, where does it stop, and what is under the place it stops. On a straight run the answer is often obvious. On a curve it is not, and a bowl that holds water will find the failure before the client does.
Setting out on site beats correcting at the works
The economics of curved work reward getting the geometry settled early and punish every change late. A template taken after the substrate is complete costs a site visit. A curve recut after the pieces are made costs the piece, the slab it came from, the freight, and the schedule.
That means the sequence matters more than it does on straight work. The substrate should be finished and stable before templating. The tangent points and the ends of the curve should be agreed and marked physically, not just dimensioned. The drain positions and any penetrations should be fixed, because a curve that has to be cut around a drain is a curve with one unique piece in the middle of it. And the joint plan should be signed off at the same time as the template, because the two decisions constrain each other.
Where a project cannot wait for the substrate, the alternative is a two-stage order: get the straight field and the repeatable parts into production early, and hold the curved pieces until the site can be templated. That keeps the schedule moving without cutting stone against a drawing that the building has not yet confirmed. It is also the arrangement that makes a curved job tolerable for both sides, because the risk is concentrated in a small part of the order instead of spread across the whole delivery.
The piece on quoting from a drawing covers what a set of drawings has to contain, the article on reading a slab explains why the block has to be chosen before the shapes are nested into it, and the stair treads article and the wet edge article deal with two of the places curves most often appear. Curved and shaped work as it comes off the machines is photographed across the works pages, and finished sweeps, kerbs and pool edges on site are in the installation gallery.
Send the plan with the curve dimensioned to its centre, a section through the edge detail, the finish, and the joint positions if they have been decided. Where the site is already built, a template is worth more than any drawing. From that we can tell you which pieces are cheap because they repeat, which are unique, where the tooling will limit the radius, and what the curve actually adds. The stone index shows what can be cut from, and a plan sent through the quote page gets a first read from us.
Every figure on this page comes from our own order sheets. Where something is a trade norm rather than a number we can hold, we say so — send a spec and we will confirm it against a real block before you commit.
More from the yard
Send the drawing. We do the rest.
Reply within one working day, in English or Chinese. Send a spec, a drawing or just a photo of the sample you are matching — we will tell you honestly whether we can hold it.
MOQ 1 × 20FT · FOB XIAMEN · SAMPLES IN 7 DAYS