Stone stair treads: setting out, edge profiles and grip
Stairs are where a small drawing error becomes a permanent defect: setting out stone treads and risers, solid or cladding construction, edge profiles and nosing, grip and wear.
15 October 2026 · 9 min read · GranTerra Stone, Hui'an
A stair is the one part of a stone package where a small drawing error becomes a permanent, visible defect. A tread cut slightly deep shows as a lip at every step. A riser a fraction out of step with its neighbours makes a perfectly solid staircase feel wrong underfoot — the foot reads the inconsistency before the eye explains it. And unlike paving or cladding, a stair cannot be corrected on site by bedding a slab a little deeper: the pieces arrive finished, and the stone is what it is.
This article treats stone steps as one package: how a stair is set out before anything is cut, what changes when you lay stone over an existing stair instead of building in solid treads, how edge profiles and surface finishes decide grip and wear, what happens outdoors when water joins in, and what we need in order to cut a stair that installs without a fight.
Why a stair is a drawing problem before it is a stone problem
Every stair is fixed by three things, and none of them is a standard: the rise between finished floors, the number of steps that rise is divided into, and the going of each tread. Whether those suit a stone finish depends on the build-up beneath — screed, mortar bed, an existing structure — which is why the stair drawing should be finished before the stone is ordered, and why our treads and risers are cut from the drawing rather than picked off a shelf. A stair cut to a standard ladder arrives needing a packer under the first step, and the packer is the thing the client notices a year later.
The commercial side of that is unglamorous but it saves money: a stair measured after the block has been sawn carries a lead time on every change, while a stair sent as a drawing does not. Quoting from a drawing instead of from a catalogue is the process behind cut to your drawing.
Setting out: rise, going and the tolerance that shows
What makes a stair feel right is the rise, and specifically that every riser is the same. A variation invisible on a paving job is unmistakable on a stair: it is read by the foot before it is read by the eye, and no amount of stone quality hides it. So the set-out starts at the finished floor level at the bottom and finishes at the finished floor level at the top, and the whole rise is divided before the first cut.
That has two consequences for the specification. First, the stone package has to know where the finished floors land, because the bed, the screed and the floor finish all move the first and last step — and the first step is where most stair complaints begin. Second, landings belong to the same exercise. A half-landing interrupts the rhythm; treated as an ordinary floor slab with a stair bolted on either side, it is the point where the set-out stops adding up. Where landings are cut as cut-to-size paving in the same stone, they should be set out with the stair rather than after it.
Solid treads, or stone laid over an existing stair
There are two ways a stone stair gets built, and they ask different things of the cut.
On a new build the treads are usually solid stone, bedded and jointed on a concrete or steel structure, with risers either solid or a facing piece. The stair is designed around the stone, and a structure sized for solid treads carries the weight without argument.
On a refurbishment the stair already exists and the stone is a cladding exercise: treads and risers cut to sit over what is there. This is where the set-out gets tested, because an existing stair is almost never as uniform as the drawing suggests. Cladding a stair means measuring the actual stair — every step, not a sample of one — and allowing a bed that absorbs the variation without turning it into a different riser height. Where the structure is badly out of level or out of step, the honest answer is usually to even it out before the stone arrives, rather than to cut stone that hides a problem in one place and shows it in another.
Edges, nosing and the line the eye follows
The edge profile is what the eye tracks on a stair, and it is also the part most exposed to damage. A square arris reads crisp and modern, but it is a thin, brittle line on the leading edge of every tread — the first thing a boot, a trolley or a dropped crate finds. A small chamfer or a rounded nose softens the read and survives better, and a bullnose is the traditional answer on an open stair where the tread is visible from the side and from below.
The nosing itself is a decision rather than a detail. Whether the tread overhangs its riser, and by how much, changes both the look and the way water behaves outdoors: on an exterior stair an overhanging nose throws water clear of the riser below instead of letting it track back under the tread, which is the same principle we use at the wet edge of a pool.
Grip, finish and wear: choosing the surface for the stair
Slip is a property of the surface, not of the stone’s name, and on a stair it is settled at the same moment as the finish. Indoors a honed face is usually the right answer: enough texture to read as stone underfoot, easy to clean, and safe in the conditions a dry indoor stair actually sees. Outdoors, and anywhere a stair is used wet, a flamed or heavily textured face does the work, with the fall carrying water off the tread instead of letting it sit. Our finish guide works through where each face belongs.
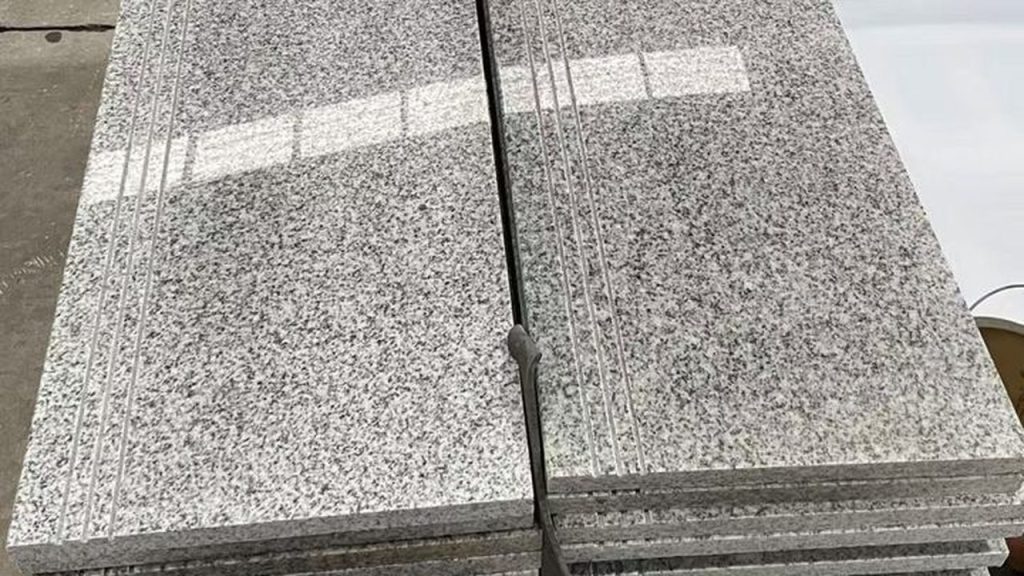
There is a practical middle path that most exterior and public stairs end up using: anti-slip grooves worked into the tread face. They add grip exactly where the foot lands, they are cut in the workshop rather than applied later, and because they are part of the stone they do not peel, shrink or collect the dirt that a surface-applied strip does. The treads at the top of this page were cut that way.
Wear shows up in the same place as grip: the nose. Over years of traffic the leading edge loses its sharpness first, and the softer or more thinly veined the stone, the sooner it happens. That is a material choice before it is a finish choice — a hard, even-grained granite holds an edge where a softer stone rounds over — and it is the same question of what you are actually buying that choosing between granite, basalt and porphyry sets out.
Outside stairs: water, ice and movement
An exterior stair is a drainage problem with steps on it. Water arrives on the treads and leaves by the fall, the joints and the landings; where it cannot leave, it sits, stains, freezes and eventually lifts. Exterior stairs are therefore set to a fall, jointed so they drain, and detailed so that water reaching a landing leaves it rather than following the wall or the riser down into the structure.
Public and semi-public stairs add a second duty: people have to be able to read the step before they take it. A tactile surface at the head and foot of a stair warns a cane or a foot before the step does, and on municipal work it belongs with the tactile paving at the approach rather than being added afterwards; the wider question of what survives in public use is covered in kerbs, setts and tactile paving. Movement is the other outdoor issue. A stair is a short run pinned between two levels, so structural joints, expansion joints and changes of substrate must run on through the stone instead of stopping beneath a tread.
Packing a stair, and what to send for a quote
Treads are the heaviest and most edge-vulnerable pieces in most stone orders: long, narrow, and finished on the top face and the nose. They travel in crates with the noses protected, never stacked loose on an open pallet, because the damage that costs a project a week is a chipped nosing discovered on site rather than a broken slab discovered in the yard. Loading, crating and edge protection are described in how a stone order ships; the factory pages follow a piece from saw to crate.
To quote a stair we need:
- The stair drawing or elevation. Rise, going, number of steps and landings — or a site survey of the existing stair if you are cladding over one.
- Finished floor levels at both ends. The first and last step depend on them, and they are the source of most site adjustments.
- Solid or cladding construction. It changes the bed, the joint and how much variation the stone has to absorb.
- Edge profile and finish. Arris, chamfer or bullnose; honed, flamed, or grooved for grip.
- Which stone, and how it wears. Nosing wear is a material decision, not only a look.
- Exposure. Indoor stair, covered entrance, or fully open to sun, rain and salt.
Send the drawing, or photographs of the existing stair with a tape held against the first, middle and last step, and you will get back a cut list, the edge profiles and a packing plan. To see how these stones behave once they are in service rather than on a sample board, the installation gallery is all real photographs and the materials pages cover colour and movement across blocks. The quote page is the fastest way to reach us.
Every figure on this page comes from our own order sheets. Where something is a trade norm rather than a number we can hold, we say so — send a spec and we will confirm it against a real block before you commit.
More from the yard


Send the drawing. We do the rest.
Reply within one working day, in English or Chinese. Send a spec, a drawing or just a photo of the sample you are matching — we will tell you honestly whether we can hold it.
MOQ 1 × 20FT · FOB XIAMEN · SAMPLES IN 7 DAYS